Tuesday, March 26, 2013

April Fools Meal

Last year, I started on a kick to make meals that fit holidays (not Christmas and Easter and Thanksgiving but the silly little ones....) 
Like April Fool's Day, so for dinner we had cupcakes....

Or did we?? :)


I found this idea on family fun's website (they have the cutest simple ideas) - 
The kids loved it (even the ones that rarely eat meatloaf because, well, it contains beef).

One asked to do the idea again this year (which is funny because it's not much april fools joke when you know it's coming, but we'll probably go with it.)


I used the meatloaf recipe that my mom uses - I think it came from Lipton Onion Soup Mix box back:


Meatloaf:
1 envelope Lipton Onion Soup Mix
2 lbs. ground beef
3/4 cup plain dry bread crumbs
2 eggs
3/4 cup water (I often leave this out unless I get the leanest beef, then it needs some water)
1/3 cup ketchup

Preheat oven to 350°. In large bowl, combine all ingredients.

In 13 x 9-inch baking or roasting pan, shape into loaf. (or in this case, fill muffin cups - don't use papers, the grease just destroys them - put the meatloaf in paper cups when you take them out of the pan to give the cupcake look)

Bake uncovered 1 hour or until done. Let stand 10 minutes before serving.

I "frosted" my meatloaf cupcakes with pink-tinted mashed potatoes...
You can use instant or homemade. I don't really have a recipe for homemade, I just make them until they taste right. (I'll figure out a "real" recipe for mashed potatoes with exact amounts of salt, water, milk, etc. later...because it would be quicker than taste testing every time over and over til I get it right.)

I use about 5 lbs of potatoes (peeled, chopped, and cooked until a fork pierced cuts the potato in half), then I drain a lot of the water, leaving some, and add a stick of real butter, salt, pepper, and enough milk to make them creamy. Blending the whole time with a hand mixer.

And I always have too many mashed potatoes left over!


Monday, March 25, 2013

Granola Bars


I have always loved granola bars and I often eat one for breakfast.  Lately I've been seeing lots of people pinning homemade granola bar recipes on Pinterest.  I pinned a couple and then went to the store and bought a big box of Chewy granola bars, haha.  However, I got up the nerve and ingredients to try it myself this past week and it was a great success!  It's really easy, and I've already made a second batch, because we ate the first one so quickly :)  This is the original recipe.

Ingredients:

2 cups quick cooking oats
1 cup crispy rice cereal
1/4 cup butter
1/4 cup honey
1/3 cup brown sugar
1/2 tsp vanilla
handful of mini chocolate chips

Directions:

1.  Mix the oats and rice cereal in a medium sized bowl so they are ready to go.  I used the store brand of both, and they tasted great!  Also, lightly spray a cake sheet with non-stick cooking spray.

2.  In a medium-sized pot, mix the butter, honey and brown sugar on medium heat until the brown sugar has dissolved.  Bring the mixture to a boil and allow to cook for 2 minutes.  If you cook it too long, the granola bars will be harder and if you cook it too short, they will be more crumbly.

3.  Remove from heat and stir in the granola mixture until all of the granola is coated.  Dump the granola into your prepared pan and press it firmly to fill the pan evenly.  You can use a spatula or your hands (once it's cooled a bit), but you need to pack it down pretty hard.

4.  Sprinkle your granola with the chocolate chips and press them down gently so they'll stay put.

5.  Allow the granola to cool for around 2 hours.  Slice into bars.  (The original recipe says that it made about 10 bars, but I got 15 thin bars the first time.  The second time, I doubled the recipe and got 15 thick bars.  My minions liked the thin bars best, because they were softer and  chewier.)

Wednesday, March 20, 2013

Mongolian Beef


PF Chang's is one of my all-time favorite restaurants, so when I found this recipe on Pinterest, I was so excited to try it!  According to my chief minion, it's the BEST meal I've ever cooked.  He tends to exaggerate a bit, but I have to agree with him that it's pretty awesome.  I'm excited to try it again soon.

Ingredients:

Sauce--

2 tsp vegetable oil
1/2 tsp minced ginger (I found it in a squeeze tube in the produce section of Walmart.)
1 tbsp chopped garlic (I used minced garlic from a jar...keeping it simple.)
1/2 cup soy sauce
1/2 cup water
3/4 cup brown sugar

Meat--

1 lb flank steak (I got 2 lbs and used half & froze half)
1 cup vegetable oil
1/4 cup cornstarch
2 green onions, chopped

Directions:

1.  Cut your flank stake into bite-sized chunks.  I used my sharp new kitchen shears, and it was SO much easier than using a knife and cutting board.


2.  Lightly coat each piece of beef in cornstarch.  I over-coated mine and had to wipe off the excess after frying, which was a pain--be sure it's just a thin coat.  Allow the meat to rest for 5-10 minutes so that the cornstarch sticks.


3.  While your meat rests, heat 2 tsp vegetable oil in a pan on medium heat.  Add in the ginger and garlic.  Quickly add the soy sauce and water so your garlic doesn't scorch.  Stir for a few minutes until the mixture is hot.

4.  Stir in the brown sugar and allow it to dissolve.  Allow the sauce to simmer for 3-5 minutes, stirring occasionally.  Remove sauce from heat and allow it to thicken as you cook the beef.


5.  Pour 1 cup vegetable oil into a frying pan and turn the heat up to medium-high.  Once the oil is hot, add in the beef.  After about a minute, flip the beef over to cook on the other side for another minute or 2.  I found out that beef cooks a lot faster than chicken, so be sure not to over-cook or it will be tough.


6.  Using a slotted spoon, remove the chunks of beef and dab off excess oil/cornstarch with a paper towel.  (This is the most tedious part of the recipe, but it's not too bad.)  Mix the meat in with the sauce.  Add in the green onions and stir over medium heat until warm.  Serve over rice.

This recipe made enough to feed both Jake and I with enough left over for Jake to have lunch the next day.  If you have a large family or kids that eat meat (Thomas just ate the rice with sauce), it may need doubling.  

It took about 45 minutes to make, but this was my first attempt.  It'll bet I could do it in 30 minutes next time.  Flank steak is fairly pricey, so it'll probably have to be more of a special occasion meal, but it is SO good...give it a try :)

Tuesday, March 19, 2013

Cinnamon Rolls

My mom made these for us growing up - and my kids LOVE them now. They're pretty easy too. They take about an hour start to finish. This is how I make them...

You'll need:
2 pkts yeast (or 4 1/2 tsp)
1/4 cup sugar
1 1/2 cup warm milk (I warm it for about 2 minutes in the microwave in the bowl)

4 1/2 cups flour
1 tsp salt
1/4 cup (1/2 stick) butter, melted

Later for the filling:
2 Tbsp butter, melted
brown sugar & cinnamon (I don't measure these)

Later for the icing:
powdered sugar, milk, and (optional) vanilla extract (I kind of measure these)

Measure milk into a medium/large microwave safe bowl (like my favorite pampered chef glass measure pitcher) - my microwave takes about 2 minutes - sometimes 1 1/2.

Mix the yeast and sugar into the warm milk, stir and let sit for a few minutes (about 5) - it should get nice and foamy as the yeast reacts.

Add flour, salt, and melted butter - stir. (There's no need to knead, but sometimes I do anyways just a few times - I think it helps with the texture and I just like to knead. My mom never did and everyone still loves them.)

Leave the dough in the bowl to rise for about 25 minutes.


Once it is finished rising, 


roll it out - long rectangle.
 (I should have taken a new picture with my awesome new rolling pin I use now...) :)

Pour (2 Tbsp) melted butter over the dough and spread around (with your hand or a brush, etc)


Spread brown sugar (as much or as little as you like)...


Then, sprinkle on cinnamon (the pictures should give you an idea of how much of these two I use)...


Then, roll it up. (Lazy method - grab one end of the foil and lift - it's not as tight a roll, but it works.)
I don't do this anymore b/c I'm obsessive about how my breads look, so I ended up re-rolling every roll as I put it on the pan. :)

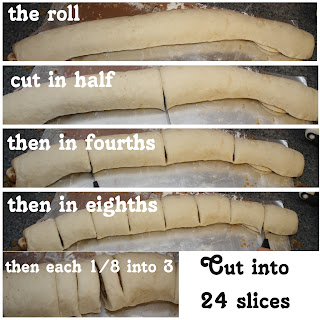
Then I slice it into 24 evenish slices (even with my 'math' going on - they still aren't perfectly even)

Good time to teach some math skills...(8 x 3, array of 4 x 6, etc)...just saying. :)


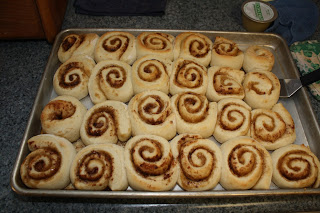
Sometimes they fill up the pan and sometimes they don't
 At this point, you can also cover and refrigerate until ready to bake (if, for example, you want cinnamon rolls hot and fresh in the morning but don't have the hour to make them)

 They always come out perfect though - just bake (I've done different temperatures and times) - my favorite is 400 (degrees F) for about 13 minutes.


 (Every oven has been slightly different - you can go anywhere from 350 to 400, just watch them until you know how long your oven takes at that temp.)

Mix about 2 cups powdered sugar with a little milk (or water) until it's the consistency you like for drizzling, spreading, etc.
(My mom's recipe has vanilla extract in it, but I don't like vanilla extract in anything that doesn't get baked - all I can taste is the alcohol in it...yuk, so I leave it out and it's just as good (better, to me). :)
You can also color the icing with a little food coloring (pink - valentine's day, green - st. patrick's day or Christmas, etc)

Pour, drizzle, spread...however thick your icing is, put it on and stand back...you don't want to get trampled in the stampede of children waiting on you to finish icing these. :)


Tuesday, March 12, 2013

Chicken Packages


These were a family favorite when I was a kid, and I love how quick and easy they are to make!

Ingredients:

2 packages of crescent rolls (16 rolls, total)
24 oz shredded chicken (2 cans or you can cook your own)
4 tbsp butter (divided)
8 oz cream cheese
1/2 tsp garlic powder
1/2 tsp onion powder (I used dried minced onions)
1 tbsp bread crumbs (can be omitted if you don't have it on hand)
2 tbsp Parmesan cheese

Directions:

1.  Preheat your oven to 350 degrees, and soften the cream cheese and 2 tbsp of the butter (10 second intervals in the microwave works best for me).


2.  Mix the butter & cream cheese with the shredded chicken.  Add in the garlic and onion powder.


3.  Combine 2 crescent rolls to make a square, pinching and pressing the seams together.  Repeat until you have 8 squares.  Place them on a greased cookie sheet.  (I bought the "big and fluffy" rolls, so I did 4 large squares rather than 8 regular-sized ones.)


4.  Divide the chicken mixture into 8 portions and spoon onto the dough.  Pull the corners of the dough together around the chicken mixture and pinch the seams closed.
 

5.  Melt the remaining 2 tbsp of butter.  Add the bread crumbs and Parmesan cheese.  Brush each chicken package with the butter mixture.


6.  Bake for 20-25 minutes, until golden.


Chicken packages go great with veggies and a yummy dessert!

Monday, March 11, 2013

Caramel Pie


I found this recipe online when we were first married (2002/2003 - somewhere in there) - it was labelled "O'Charley's Caramel Pie" or something like that. I have never had O'Charley's caramel pie - I don't even know if it's on the menu still, but copy cat recipes can be fun and this one is really good.

Really rich

But really good.

and not too hard - it just takes a while.

For each pie - you'll need:
1 can sweetened condensed milk
1 container cool whip (whipped topping)
1 oreo pie crust (premade, packaged)

Because it requires some time & babysitting, I make several cans at a time and make several pies or store the leftovers in the fridge for a later pie.

Remove the labels from your cans of sweetened condensed milk. Fill a pot with water and put your cans in the pot. (I lay them on their sides because the water level needs to stay above their cans. I have a bigger pot now, so maybe next time I'll make a whole bunch standing up in my really tall pot?) :)


Boil for 3 hours.
No, I'm not kidding - in the can, unopened, for 3 hours.
(This is where the babysitting comes in.)
The water really just needs to simmer-boil, not rolling boil. But you have to keep adding more boiling water as the water evaporates off. 
(I keep a second pot with just water to the side on another eye simmering on medium and add from there - refreshing that water and keeping it simmering too.) I just check about every 30 minutes - it's a good, I'm home cleaning all day kind of recipe you just look at everytime you walk through the kitchen.)


 After 3 hours, remove the cans and let them cool enough so you can touch them without burning yourself. 
This is what it looks like:

Pie crusts ready...

And dump it in. Spread it around.
 (I let mine cool a little longer so it was stiffer trying to spread it around.)

Top with cool whip. Refrigerate to let everything set and serve later.
(Great make ahead dessert)

The original recipe called for putting mini chocolate chips on top, and although I do love chocolate and chocolate chips, I didn't like the little hard chips with the smooth pie -

I have done syrup or other topping drizzled over the top
and I think next time I make this I might get a bar of chocolate and shave little on top.